Field top coating
The fiber cement mortar top coat serves as a mechanical protection for the plastic coating. FCM coatings are produced according to DIN 30340-1. FCM-coated pipes should be handled in basically the same manner as pipes with plastic coating.
DIN 30340-1 distinguishes between two types of coating, the FCM-N (normal type) for open-trench laying and the FCM-S (special type) coating for the various trenchless pipe-laying techniques. Pipes for trenchless laying are specially treated to give them an adhesive bond between the plastic coating and the FCM top coat. Shear forces that arise during laying can thus be safely transferred.
Field coating with casting mortar
The casting mortar is supplied in buckets of two different sizes.Bucket size A contains enough casting mortar for two DN 100 field coatings or 1 field coating for DN 250 to DN 500 pipe. Bucket size B contains enough casting mortar for two DN 150 or DN 200 field coatings or 1 field coating for DN 350 or DN 400 pipe, respectively. Buckets for DN 500 and/or DN 600 field coatings are available on request. As the setting time depends on the temperature, two different mortar mixes are available:
Winter mortar: processing temperature +5 °C to approx. +15 °C
Summer mortar: processing temperature +10 °C and approx. 30 °C
The cement mortar should not be used at temperatures below 0°C, since it has to harden in a frost-free environment. If there is a risk of frost, additional protective measures must be taken (e.g. thermal insulation). The field coating system is made up as follows:
- Cement mortar (special dry mortar and water)
- Special cardboard moulds (standard width 500 mm)
- Adhesive tape for fixing the mould round the pipe
Tools and equipment to be provided by the user:
- a drilling machine with mixer attachment
- scissors or knife for cutting the adhesive tape
The field coating can be applied by one person alone. As the mortar sets very quickly, the field coated joints along the pipe string are ready for pipe-laying including the related stresses after only three hours.
In the case of trenchless pipelines, the field coating should be given at least 24 hours to set. Further details are to be found under "Trenchless pipe-laying".
At high temperatures or under direct insolation, the field coated areas should be covered with a damp cloth in order to avoid premature drying and shrinkage cracks.
Where construction projects do not allow long setting times, the alternative or additional application of a GRP or polyurethane coating (MAPUR®) is recommended.
We will be pleased to put you in contact with the producer for detailed information on this casting system.
Field coating procedure
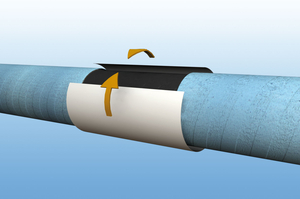
1. Slip the mould under the pipe and align it around the circumference of the field-coated joint area.
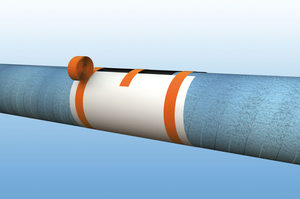
2. Use the supplied adhesive tape to fix the mould in the centre of the filling slot. This ensures a uniform annular space around the pipe. Secure the mould in position with adhesive tape. Pull firmly, lapping the tape around the circumference at both ends of the mould to seal it off.
3. Check that the mould sits firmly around the pipe circumference and make sure that there is no bend in the area of the filling slot. For pipe diameters of DN 100 to DN 200, two moulds must be prepared before mixing the mortar.

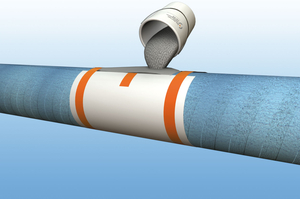
4. Take the water container out of the bucket, loosen the dry mix and pour the supplied mixing water into the bucket. Use the mixer attachment for a smooth, homogeneous mixture without lumps.
Field coating with cement wrappers
The cement wrapper is a cement-mortar-coated tape. Waterproof gloves must be worn when handling it. The wrappers are used wherever casting mortar cannot be used, e.g. for fittings or socket joints.


3. Pulling gently, wrap the wrapper around the field-coating area, making sure each wraparound overlaps 60% of the previous layer. After about three hours, the area can take all the stresses involved in pipe-laying.
Field coating of pipe bends with CM wrappers (300 x 12 cm)
| Number of rolls requires | ||||||
| Pipe bend to DIN 2605 | 15° | 30° | 45° | 60° | 75° | 90° |
| DN 100 1.5 Da | 2 | 2 | 2 | 2 | 2 | 2 |
| DN 100 2.5 Da | 2 | 2 | 2 | 2 | 2 | 2 |
| DN 150 1.5 Da | 2 | 3 | 3 | 3 | 4 | 4 |
| DN 150 2.5 Da | 3 | 3 | 3 | 4 | 4 | 4 |
| DN 200 1.5 Da | 3 | 4 | 4 | 4 | 5 | 5 |
| DN 200 2.5 Da | 4 | 4 | 5 | 5 | 6 | 7 |
| DN 250 1.5 Da | 4 | 4 | 5 | 5 | 7 | 7 |
| DN 250 2.5 Da | 4 | 5 | 7 | 8 | 9 | 10 |
| DN 300 1.5 Da | 4 | 5 | 7 | 8 | 9 | 10 |
| DN 300 2.5 Da | 5 | 6 | 9 | 10 | 12 | 14 |
| DN 400 1.5 Da | 6 | 6 | 8 | 10 | 11 | 12 |
| DN 400 2.5 Da | 7 | 9 | 11 | 13 | 15 | 18 |